Spades card game strategy and examples
Looking for that extra edge to make your game as sharp as the Ace of Spades itself? You're in the right place! I'm Holger, your Spades strategist, here to walk you through ace bids, daring nils, and the unspoken communication with your partner—it's like reading minds, but with cards!
Before you start, brush up or learn how to play Spades with our how to Play Spades guide. Ready to put your skills to the test? play Spades online with other players! Now, let's shuffle up and deal. You're about to be the Spades partner everyone wants at their card table!
Spades card game - Bidding: a good hand for a nil bid with a void
February 10 2018
On a previous page, I talked about how you sometimes have the opportunity for a good nil bid, even when you hold aces. Here is a different example where my chances for a nil bid are good. Remember, nil bids always involve some risk, but the reward for success can be huge (a 100 point gain!). So it is worth recognizing the opportunity to bid nil when it presents itself.
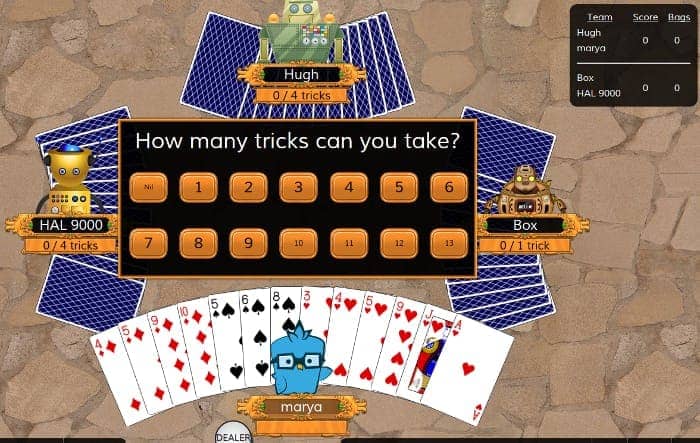
As the dealer, I am in a good position to bid nil. I can see what everyone else bid. If my partner bid 1, I'd know that they have a weak hand and probably can't do much to defend my nil. If my opponents had a high total bid - for example, nine or ten - I'd know they have some high cards and good spades, and they might be able to cover my bid even if my teammate cannot.
As it is, I see that the total bid is nine, excluding my bid. At first glance, this is not a promising sign for a nil bid! If I bid nil, there are four extra tricks that must be taken by others. In particular, my right-hand opponent, Box, had a poor hand and could only bid one. However, my left-hand opponent and my teammate both bid four. Their hands are a little bit better than average (assuming the average bid is usually three).
Another downside is that I do not have the lowest possible cards in each suit. My low cards in each suit are 3 of hearts, 4 of diamonds, and 5 of spades.
On the plus side, I do have many low cards. My only high card is the ace of hearts, but I am "long" in hearts, so chances are good that I will never be forced to take a trick with it.
Most importantly, I am void in clubs. Any time a player leads with a club, I can discard a card of another suit. Once my partner realizes I have this void, he can play a club whenever he is in the lead, and I can safely discard a high card.
I have a strong preference for bidding nil here. But keep in mind that this hand has the potential to take 2 or 3 tricks by trumping clubs tricks and catching a hearts trick with my ace. But there's a risk to counting on this, too. Suppose my teammate plays the ace and king of clubs? I wouldn't want to trump these tricks, and I may not be able to trump a clubs trick at all, in that case. Since I'm long in hearts, my ace could get trumped if another player is void in hearts.
In the end, I did bid nil. You can see how it worked by viewing this YouTube video:
Since I was already void in clubs, my strategy was to attempt to go void in diamonds, when I had the chance. Then I'd be left with just hearts and spades cards. With two voids and some low cards, I increase my chances of success. For example, if my right-hand opponent trumped in on a clubs trick, I might be able to discard a spade provided that trump card was high enough to cover my spade.
You might ask "why try to go for a void in diamonds, rather than hearts?" There are a couple of reasons. I have three of the lowest hearts cards, so the chances are good that I will avoid getting set no matter how many times hearts are led. In contrast, if someone leads with the 2 or 3 of diamonds at the end of the hand, that could get me set. In addition, with only four diamonds, it will take me four tricks to go void in diamonds. With six hearts, it would take nearly half the tricks played to get rid of them all.
It turned out that the void in clubs helped to make my nil a success. I discarded my highest cards when clubs where led. This gave my partner valuable insight into the highest cards in my hand, which helped him to successfully defend the nil. If you are defending a nil, it really pays to note which cards your partner discards. Look for their voids and highest cards to get a clue about which cards you should play.